Saturday 30 June 2018

Test Of Honour

A "personal perspective" of the game.


From the designers notes:~
"what kind of game should it be.........the classic Kurosawa samurai movies such as Seven Samurai and Yojimbo where incredibly skilled heroes lay waste to dozens of lesser warriors in dazzling displays of lightning-fast sword-play, rather than a slavishly accurate historical approach.
Warriors are never trapped in combat....a samurai can strike at an enemy in front of him then spin round and charge someone else and someone else, without getting locked in place in a static exchange of blows.
Each dice roll (more or less) represents a single swing of a katana, so it can really feel like you're striking and parrying in a flurry of blows!
The possibility to have that moment where a samurai slices through a whole string of enemies in an amazing display of nearly super-human ability, unashamedly based on samurai in the cinema!"

Did they achieve these design objectives?  I would certainly say they did - and in a surprisingly "rules light" system too, which is easy and intuitive to learn. The "Battle Guide" provides a series of six linked scenarios, and you'll find yourself referring to the main rulebook less frequently as you progress, and probably not needing to look at anything in there except the "Weapon Bonus / Fumble" tables before you even reach the last scenario!

The game is skirmish level and intended to be played with "10 to 20 miniatures per side", though I see no reason why it won't play just as well with fewer or more if you desire (in fact, the opening scenario in the Battle Guide is played with just 6 minis per side - just to prove that point!)

The multi-part plastic miniatures provided in the core game are from the original Wargames Factory range, supplied with 25mm round Warlord games bases, plus a number of 60mm round sabot bases for groups of 3 minis each. Easily enough to provide all the minis you'll need to represent the samurai and ashigaru (foot soldiers) armed with yari (spears), yumi (bows) and teppo (muskets).
Of course, there's nothing to "lock" the rules to the minis, so there's no problem using any of the superb ranges from other manufacturers.

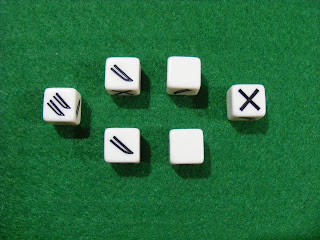
The special dice used in the game are supposedly designed to speed up gameplay - the rolled result IS intuitively read directly from the dice faces and saves referring to charts or tables, and those little sword blades do kind of fit the theme of the game. But are they really necessary??
The core mechanic used in the game is what I believe to be referred to as a "goal system" - you roll dice for whatever it is you want to do, and need to score a number of  'successes' to do it. The better you are at something, the more dice you roll.
eg: an ashigaru spearman wishes to strike his opponent - he gets to roll 3 dice, and as for all rolls in Test of Honour he needs 3 successes. A samurai hero wanting to strike an opponent will roll 5 dice looking for those 3 successes (because he's better trained in the arts of Bushido!)
The ToH dice faces show 2 successes (2 swords), 1 success (1 sword), no successes (blank), fail (X)
and there are 1x2 swords, 2x1 sword, 2x blank and 1x fail,


easily translated to a normal d6:~
6 = 2 successes
5 = 1 success
4 = 1 success
3 = no success
2 = no success
1 = Fail


which is pretty easy to remember too - "above 3 is a success, 3 or less is a fail - 6 is a 'bonus' success, 1 is a 'bad' fail!"
(In the game, if more fails (X's) are rolled than successes (swords) the result can be a "Fumble" - which of course, is far worse than simply failing!!!)
Having said all that, I've got the white dice that came in the core box, and I've also forked out on a second set of red ones, so I guess I must like them.......... but now you can download the free rules pdf from the Warlord Games website and give them a try with a handful of normal six sided dice!


So, what's not to like about Test of Honour?
Having said how much I LIKE the rules, I'm less than happy about their "availability" (for want of a better word)
The so-called "Main Rules" booklet supplied with the core boxed game (and did I mention available as a free download pdf?) are in fact, the "Basic Rules"!
If you want to use the Skills, Dishonour and Wounds cards (supplied in the boxed set and packaged with the "expansion" miniatures), then you'll need the rules published in the "Battle Guide" booklet - only available in the core box!
If you want the rules for climbing, leaping, entering buildings, using mounted troops, defended positions, darkness, random movement, hidden troops or carrying objects, then you'll need the "Darkness and Deceit" booklet only available in certain boxed sets of  "expansion" miniatures,.....
while further, "Optional Rules"  (containing unexpected actions, rivers, lakes and paddy fields, 'shot in the back', 'aftermath' and 'special events' including weather rules) are only available as a free pdf from the Warlord Games website (as is a highly recommended "Errata & FAQ")
I don't know if the above list is even complete - who knows what's been included in the boxes of minis I don't have??????
So, my gripe is that there's no "consolidated" rulebook - and yes, if one was made available, I'd want it.

Now, speaking of the boxed sets of "expansion" miniatures. The plastic sprues in the core box are great to get you started, but there's only 'so much' variety of poses available (even with their multi-part nature), and it was somewhat of a disappointment to find the early expansion  releases only contain one 'new' (metal) mini along with a sprue from the core box, plus some metal 'variant' heads for those plastic warriors.
Yes the new minis are superb, and yes the variant heads are great - but for someone who's not even using all the sprues from the core box I found this a huge disappointment.
Having learned my lesson, I now look VERY carefully at the contents of the boxes, and where the above is true - hit ebay for the heads and single minis and the "Recruitment Cards" that go with them from the independent "spares" sellers. Far cheaper than buying the boxed sets and accumulating yet more sprues of old Wargames Factory ashigaru!
Before I gripe, I must mention that doing this has introduced me to a local (literally the other side of the village) "cottage industry" trader, who has become a good friend - so that's a positive comment to counterbalance the negative!

To sum up, I'm very happy with the game - especially since it got me back into a genre that I love but have neglected since my return to gaming.
How it measures up against other "samurai skirmish" rules I've yet to find out, and plan to do - but until then you can expect some more Test of Honour reports here on the blog!

 Ki o tsukete.


Thursday 28 June 2018

"Rescue"

The last of the six scenarios from the Test of Honour "Battle Guide", and here's the briefing given to Tanjiro...
Grateful for your protection, the geisha spy has revealed the whereabouts of your brother, held prisoner by the enemy clan.
You set out to make your rescue attempt, though your thoughts linger on the brave woman who helped you.
With the information she passed on, you are able to approach the location undetected, now is the moment to launch your attack.

Recruitment limit: 24 points.
The Mori clan deploys 12 points of warriors, including Yoshihito, anywhere on the table. The remaining warriors are left off-table as reinforcements. They may enter (after a successful "Test Of Wits") from any table edge other than the one Takeda choose for deployment.
The Takeda clan choose which table edge to enter from and deploy within 3" of that edge.
Takeda will draw the first token.
The Takeda must find the captive and escort him off the deployment table edge to win the game, Mori claim victory if both Takeda samurai are cut down before a successful rescue.

This was the toughest of the scenarios as far as solo play goes - especially selecting the forces to maintain a balance. In the end, I opted to create three different "orders of battle" for the each of the clans and chose two randomly.
Here's the initial set up.....
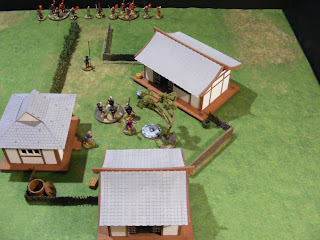
Yoshihito was deployed in the courtyard, seen here briefing the yumi (bow) and their ko gashira (sergeant). A lone yari (spear) armed ashigaru stands guard at the entrance.
The loyal samurai Muratagi Kozui, ko gashira Tamaki Jiro plus 3 more ashigaru armed with yari and a unit of loyal  yumi formed the off-table reserve.
The Takeda samurai, Murayama Tanjiro and Yoshihara Suzu approached directly along the track, flanked by their ashigaru - yari ko gashira plus two units of yari, and yumi ko gashira plus three individual yumi armed ashigaru.
Tanjiro knew he would have to act quickly to find and rescue his brother before the Mori reinforcements could arrive and add their numbers to the fight......
.......and advanced directly, ignoring the ineffectual shooting from the Mori yumi, and cut down the guard at the entry to the compound. The first of the Mori reinforcements (Kozue and Jiro) arrived on the Takeda right flank, and the ko gashira took the nearest unit of yari to deal with them.
Meanwhile, Tanjiro pushed on and clashed with his arch rival Yoshihito. The Mori samurai blocked and then launched a blistering counter attack, cutting down his opponent before receiving a light wound from a Takeda archer.
The situation at end of turn one.
Seeing his leader fall, Suzu (a "Wise Samuarai" according to his stat card) leapt over the fence and put the bulk of Takeda yari troops between himself and the enemy bowfire. Yoshihito meanwhile, crossed the hedge to assist the flank attack but came up against stubborn resistance from one of the enemy yumi armed ashigaru who continually dodged his attacks.
A single Mori spearman arrived and joined the flank attack, slowly forcing the Takeda yari group back, their ko gashira falling back to the line of the hedge, intending to block the gap in case fresh Mori reinforcements arrived and attempted to attack the Takeda rear.
The situation at the end of turn two.
The Takeda yari group was taking heavy casualties and Yoshihito had finally cut down the brave ashigaru archer (taking another light wound from the yumi shooting at him from the roadway), as Suzu made his way around the back of the house - wisely seeking cover?
After a series of bitter attacks and counters, it was the beginning of the end for the Takeda right flank...
.....but still the remaining ashigaru spearman launched a last-ditch charge against the enemy bowmen in the courtyard.......
 .....as Yoshihito charged the man who had just wounded him!
The Takeda ko gashira failed his "Test Of Honour" for seeing his compatriot cut down, and retreated (off the table) to his shame.
Out of sight of the majority of the action, Suzu had made his way through the house and was about to attempt the rescue....... 
...completely unaware that the rest of his buntai were virtually finished, and the Mori warriors were no longer "distracted" by events outside the courtyard.
The situation at the end of turn three.
As Suzu prepared to dash out and seize the nearest captive, the yumi armed group and the ko gashira were knocking arrows to strings.
A hail of arrows found their mark, and Suzu was cut down before he could set foot outside the doorway, and with him fell any hope of a final victory for the Takeda in this campaign.
The final situation.
The fight had gone terribly for the Takeda - Tanjiro's headstrong heroics as he tried to free his brother was a mistake, though last time the two samurai leaders met in a duel it raged on for quite a while and kept Yoshihito out of the main fight for a significant length of time.
The initial deployment saw the Takeda with a 2-1 advantage, but given the fact they were attacking a "defended position" perhaps the accepted military wisdom of a 3-1 superiority would have been a better decision.

Only half of the Mori reinforcements arrived before the end of the battle, but Kozue, Jiro and the single ashigaru spearman played a significant role by appearing early and effectively pinned the Takeda right flank, slowing the advance to the objective.
On reflection, this scenario was heavily weighted in favour of the captors - I could see very little chance of Yoshihito's men reaching the captives, "searching them" (passing a test of wits) to find the missing brother, and escorting the prisoner back off the original point of entry.

Still, it was yet another action packed and enjoyable game, and the result provides plenty of "plot seeds" for future games..................... Tanjiro and Yoshihito will meet again on the field of combat!
(But after a personal "review" of Test Of Honour, and when the 'heatwave' has finished)

Domo arigato for visiting and reading, and as ever, your comments and queries are invited.
Genki de!

Tuesday 19 June 2018

"Breakthrough"

This is the fifth and penultimate scenario in the Test of Honour "Battle Guide" as I work my way through the introduction to the game and build up my miniatures and terrain.

Takeda Briefing:
Though your enemies managed to grab the spy, they still have many miles to travel before reaching the safety of their clan's territory.
You have managed to overtake them and now stand barring their way.

Mori Briefing:
Travelling with the beautiful geisha has been slow and has allowed your enemy to block your path in an attempt to steal her away from you...

The "Recruitment Limit" for the scenario is 21 points as per the previous encounter - since this is obviously an immediate follow-up, I think it makes more sense to keep exactly the same forces as there would have been no time or opportunity to change them.
Perhaps more importantly, I've decided to introduce a house rule "walking wounded" - the warriors cut down in the earlier battle were helped from the field and 'patched up' by their comrades, but will start this encounter carrying a "Light Wound" blood-drop marker.

The Mori deploy with a member of their buntai  escorting the geisha, and the scenario objective for both factions is to keep or take control of the spy and escort her off the opposite table edge.
Yoshihito stepped along the road cautiously, ensuring he could react to any attack from the waiting Takeda warriors, and was not surprised to see Tanjiro striding towards him with a drawn sword in each hand and hate in his eyes!
The two samurai clashed with a flurry of strikes and counter-strikes, the sun glinting from their razor sharp blades and the air ringing with the sound of steel on steel.
Each of the buntai leaders was determined to defeat his opponent, and attacked at every opportunity.
The Mori bowmen had advanced along the roadside fence, and fired at the Takeda leader as the duellists faced each other - missing their target even at such close range.
(This poor shooting was to become a feature of the encounter!)
With both bushi evenly matched, neither of them had managed to penetrate the others defence,  until Tanjiro used a skill given to him by the hands of fate.......
...... his attack caught Yoshihito, but only caused a light wound. Jiro, the ko gashira in charge of the Mori spearmen advanced cautiously behind the hedge and ordered the loyal spears to attack the enemy samurai,
one of their spears finding its way through the warriors defence but only causing a light wound.
As Yoshihita stepped back from the spearmen's attack, the ko gashira leading the Mori archers saw his chance and loosed an arrow........
His aim was good, the samurai failed to dodge the shot, but the arrow narrowly failed to cut him down, but caused a second light wound!
Attempting to seize the advantage, Yoshihito charged again...........
..... only to be repulsed by Tanjiro's dogged counter attack a moment later which evened the score
(2 blood drops each)
The situation at the end of turn one.
The fight on the road has effectively blocked that route for the Mori to escort the spy, and the second Takeda samurai is in a threatening position in that area. The spearmen on both flanks have advanced cautiously, but both groups of bowmen have taken up static positions, looking for opportune targets.
Kozue makes the decision to lead the spy off the road and through the hedge onto the Mori right flank, and try to get her away from the fight.
(Kozue and the experienced spearmen are carrying the blood drops from the previous encounter)
On the opposite flank, the Takeda ko gashira has advanced to threaten the enemy bowmen and his spearmen have charged their squad leader,
who is impaled on the tips of the yari and cut down!
First blood to the Takeda, but it could have been much worse for the Mori if any of the nearby warriors had failed their "Test of Honour" for seeing the ko gashira fall.
The spearmen on the opposite flank advance cautiously towards each other,
and the duel between the two samurai heroes rages on in the centre, as Yoshihito inflicts yet another wound on his enemy!
Yoshihara Suzu, the Takeda "Wise Samurai" lived up to his title, and instead of being drawn into the battle on the road, crossed the hedge and challenged Kozue and the spy.
Jiro charged forward with his yari, but was expertly blocked by the samurai's katana,
while the Takeda spearmen, on seeing the samurai appear on their side of the battlefield, charged their opposite number and managed to despatch one of the group.
The situation at the end of turn two, with everything still in the balance.
Summoning what was left of his failing strength, Tanjiro launched yet another blistering attack on Yoshihito, who was finally cut down in a spray of blood!
Once more, the Mori warriors had to test their courage after seeing their leader defeated and once more they all stood firm - except Kozue, who lost his nerve (and his grip on the spy) and retired away from the bloodshed.
Then, as the fight between the two groups of yari armed ashigaru continued, 
Suzu stepped forward to snatch the unguarded geisha before anyone else could react!
Kozue charged back and attempted to drive off the Takeda samurai, and restore the honour he had so shamefully lost by deserting his duty....
... his impetuous charge allowed him to wound his opponent, but the careless attack allowed a counterstroke (ie he fumbled the damage roll and Suzu struck back).
Suzu now had the initiative and began guiding the geisha spy to safety,
Jiro attempted once more to drive off the samurai,
but was forced back himself by the warriors superior swordplay.
Seeing the wise samurai's attempt to escort the spy away, Tanjiro attacked the Mori spearmen to prevent them becoming involved in the fight over on that flank,
with the Takeda spearmen keeping the Mori bowmen occupied,
it was down to Kozue to try and prevent Suzu escaping with the prize.
He attacked once again and this time drove his opponent back with another light wound.
behind him, the remaining spearman attacked and drove back the Takeda group, also with a light wound - could fate be turning in favour of the Mori again??
The position at the end of turn three.
At this point Tanjiro makes use of one of his skills,
allowing Suzu to put distance between himself and the pursuit,
which Suzu then immediately followed up with his own 'normal' move and escorted the geisha safely from the battlefield !
Situation at the end of the game, which in all truth is basically the same as the end of the previous turn apart from Suzu's triumphant exit from the table - claiming the first victory on behalf of the Takeda buntai!

Another thoroughly enjoyable scenario to play, along with a chance to "field" the two buildings I've added to my collection. These are a pair of 'Country Dwellings' by Plast Craft Games and sold as part of their 'Fukei designed for Kensei' range.

I hope you enjoyed the AAR and will call by again soon for the final episode in this series.