Introduction from the Battle Guide
"The Mori clan lord has tasked Yoshihito with guarding this outpost, and though he privately feels it is beneath him, he cannot refuse the order.
His troops are spread out as the sun begins to set, when the attackers are sighted and Yoshihito yells for them to hasten to his side"
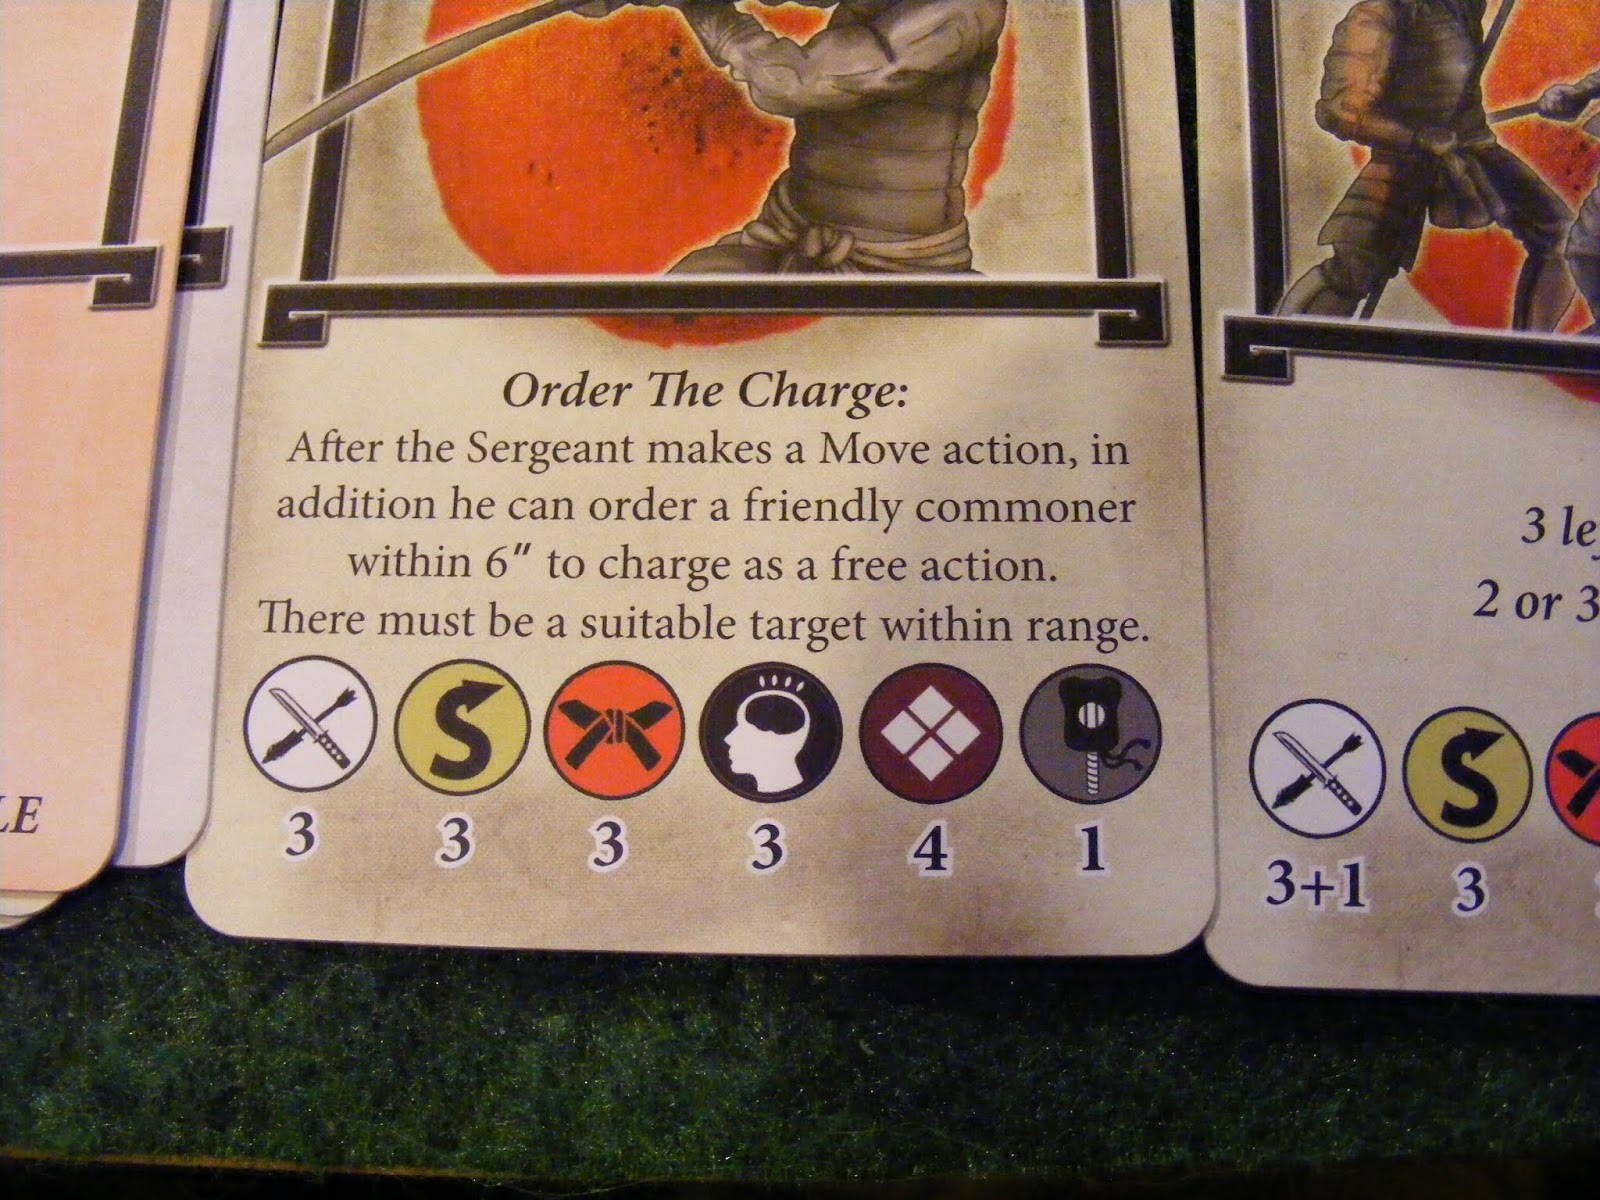
Yoshihito deploys up to 10 points worth of warriors on the table including himself. The remaining warriors are left off table as reinforcements. When any off table elements are activated, they must pass a Test Of Wits to allow them to move onto the table - if they fail, they they will gain one dice for the test for each subsequent test. The reinforcements will appear on any table edge except the one chosen by the Takeda clan.
 | |||
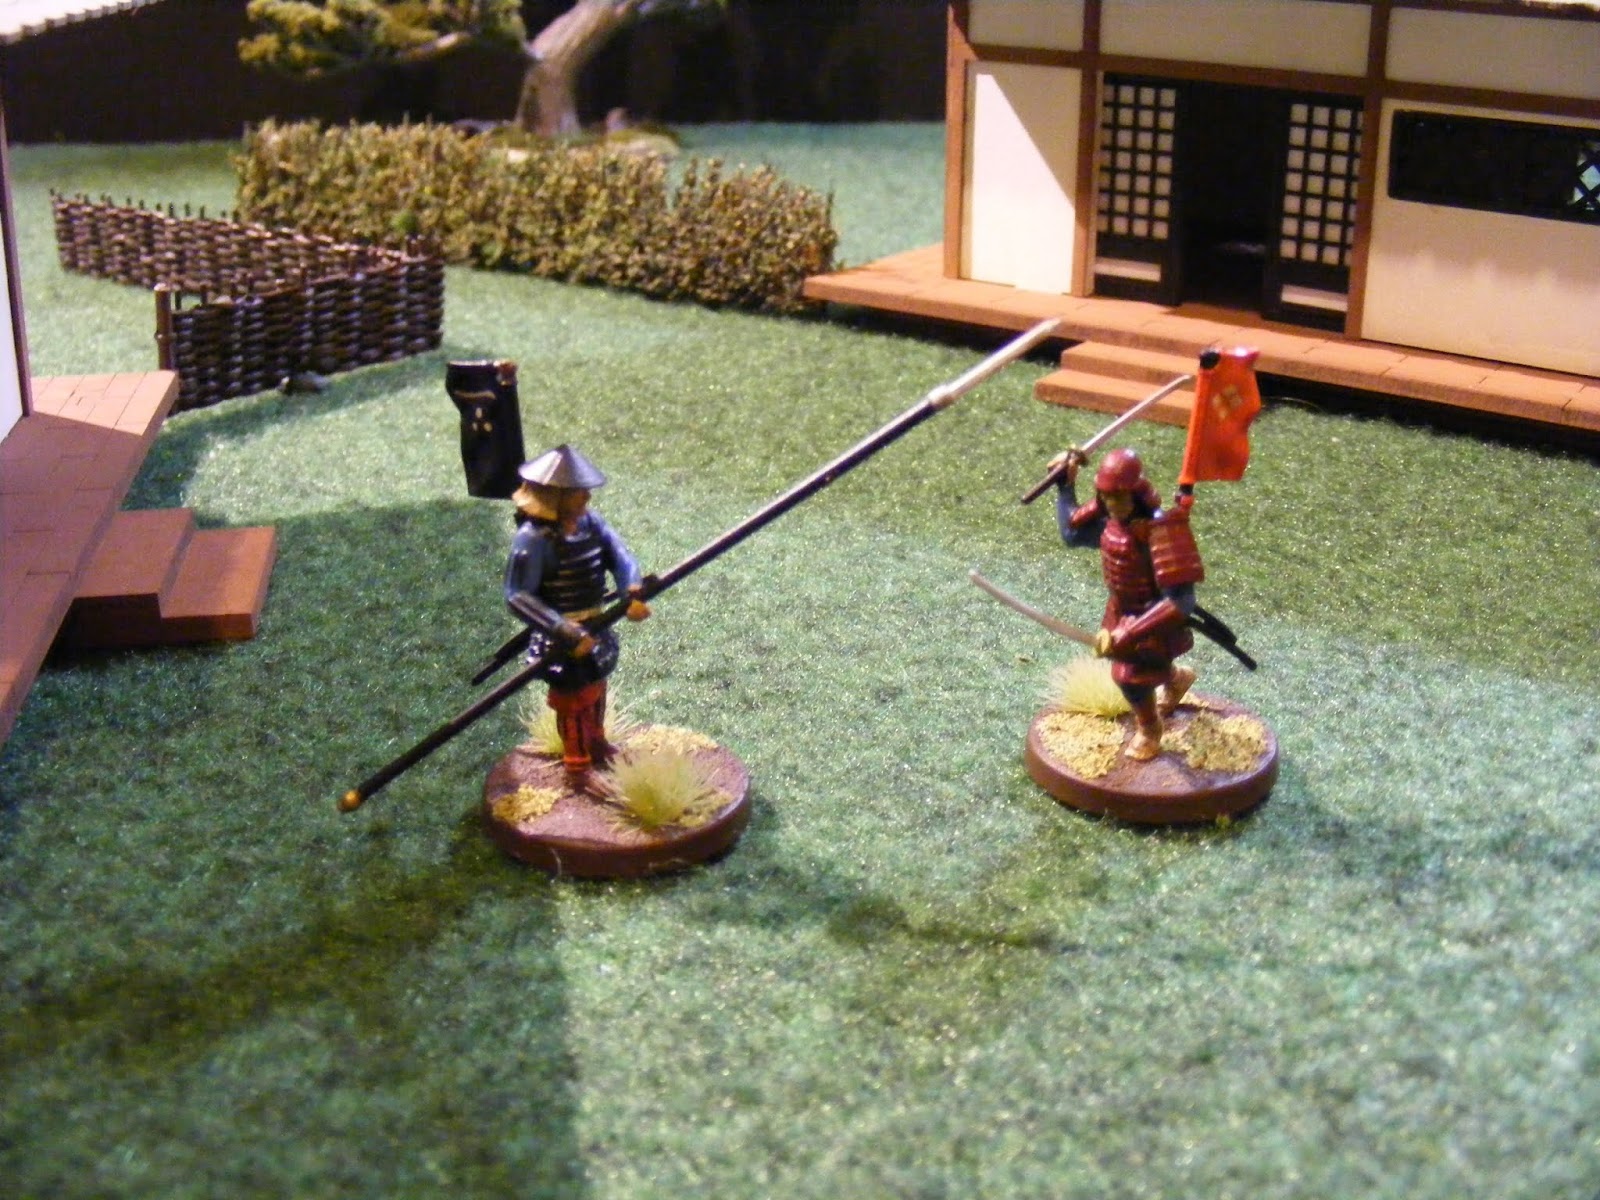
| Yoshihito and his Experienced Spearmen |
"Though Tanjiro's wounds have healed, the humiliation of defeat still stings and he has been waiting for an opportunity to take revenge.
He has tracked his foe to a small outpost that he is guarding on behalf of the Takeda clan.
Seizing the outpost will teach him the lesson he deserves"
Tanjiro will deploy his complete force within 3 inches of a table edge of his choice.
 |
| Tanjiro attacks the 'open' side of the outpost |
Ending The encounter: The battle ends at the end of turn 5, as darkness falls. Whichever side controls the most objectives at this point is the victor - the other side flees.
Turn One.
As soon as he sees his despised rival, Tanjiro strides forward, shouting his challenge!


but before the Takeda could achieve a general advance, Yoshihito's Loyal Spearmen appeared on their flank. The bowman spotted them and fired, but their surprise appearance obviously spoiled his aim.

At this point Yoshihito answered Tanjiro's challenge, stepping out and cleverly putting his opponent between himself and the remaining archer.

Tajiro charged and aimed a vicious cut at the Mori samurai - Yoshihito attempted to block the cut and stumbled, losing his footing and falling to the ground. The razor sharp Katana struck home and cut down the samurai hero.
(Yoshihito attempted to reduce the damage by taking a Test Of Honour, but failed. The Mori spearmen passed their Test Of Nerve after seeing one of their warband cut down.)

The Mori clan drew a "Samurai" activation, which they had to pass over to the Takeda since their hero was now out of the fight (a delightfully cruel twist in the rules!!) - Tanjiro immediately used it to charge past his fallen opponent and attack the group of spearmen, cutting down one of them with a masterful strike.

The Takeda 'experienced spearmen' advanced towards the outpost,

Both sides then drew 'Fate Tokens' before the Mori attempted to activate the sergeant of archery, who failed his Test Of Wits. The archer on the Takeda right then advanced far enough to give him a clear shot at the Mori spearmen, causing a light wound.

The Mori then drew the third Fate token, ending the first turn.
Turn Two.
The spearmen charged their samurai opponent, forcing Tanjiro to avoid an accurate strike.

Takeda drew the first Fate token of the turn, anf Mori drew a Samurai activation which was again passed over allowing Tanjiro to charge again - cutting down another of the Mori experienced spearmen, pushing back the remaining member of the group!

allowing the Takeda archer on the opposite flank another clear shot, which he fluffed!

The mori loyal bowmen passed their Test of Wits this turn and made a half move onto the battlefield,

and fired a volley at the opposition leader causing a light wound.

Much to the chagrin of the Takeda archer, who again failed to hit any of the spearmen target!

The Mori clan drew the secon Fate token, before the Takeda spears charged their opponents on the flank again. Causing another light wound and pushing them back once more.

The third Fate token was then drawn by Mori clan, ending turn two.
Turn Three.
The lone spearman charged the samurai, but his strike was blocked (with more than 5 'swords') and the Takeda hero launched a "Quick Jab" counter, narrowly missing the spearman.

With night approaching, the attackers had a sense of urgency about them, as the battle on the flank continued - the Takeda loyal spears charge once more failing to land a successful strike.

The mori drew the first fate token of the turn, and then the Takeda experienced spears moved into the outpost.

at this crucial time, the Mori drew a samurai token, and Tanjiro charged the lone spearman again.....

..... and again the sword failed to get past the yari (This guy deserves a promotion!)

Takeda and Mori draws were both Fate tokens, so turn three ended.
Turn Four.
The Mori first draw is a Fate token, while Takeda draws samurai activation. Tanjiro continues his duel with the stubborn ashigaru spearmen, aware that more of his retainers are arriving to witness the fight - he charges......

...... and fumbles the strike (more X's than swords), allowing the spearman a counter thrust which causes the samurai to step back with another light wound!

The Mori clan draw is a commoner token, allowing the loyal archers to fire a volley at the wounded samurai,

their aim is good and Tanjiro fails to make an avoiding move (he also failed a 'Test of Honour' attempt to reduce the wound), and was Cut Down!
The spearmen and sergeant pass their 'Test of Nerves' on seeing their leader fall, and the sergeant advances into the outpost...........

.... before using his ability........
........ to launch the experienced spearmen group against the impudent ashigaru foot soldier - who yet again stands his ground as the attackers fail to land an accurate strike!

The Mori draw a Fate token so can do nothing, and Takeda draws a commoner activation, sending the spearmen against the lone defender again under their own activation this time,

The Mori bow sereant finally activates, and steps into the fray before firing a well aimed shot at the opposing segeant in the outpost, causing a light wound.


Turn Five.
The Takeda sergeant secures the objective on the far side of the outpost,


The Takeda can only continue the fight out on the flank - the archer fires another shot at the spearmen, missing again. He'll probably blame the failing light......

Their strike is accurate, and the block poor, allowing a damage roll which is also good, cutting down one of the Takeda loyal spearmen.


Both samurai heroes accumulated "Skill Cards" drawn from the "Fate Deck" (which is made up of Skill Cards) each time their clan drew either the first or second Fate token during the game - though neither of them had an opportunity to use them during the game before being Cut Down.
They will now examine those cards and choose one each to carry forward, and since Yoshihito was awarded one Skill Card for his victory in the first scenario, he'll progress with two Skill Cards to Tanjirto's one.
Both heroes were cut down and received Injury Cards in this encounter (They received a major wound and would have been automatically "Cut Down", but both took the option of attempting a "Test Of Honour" - rolling their five Honour dice trying to score three or more swords, which would allow them to reduce the wound to "minor" and accrue a 'Blood Drop' marker).
Yoshihito has deep cut to his left arm, and Tanjiro has a head wound - these injuries should have healed before the next encounter!
Conclusion: I enjoyed the first game, but this one was even better! It really ebbed back and forth throughout, and individual elements really became characters in their own right. As the game progressed, it actually developed an engrossing "Kurosawa-esque" feel to the action as I had to think less about the rules mechanics and just enjoy the scenario.
I'm fairly confident that the next scenario "The Battlefield" will be a more enjoyable read and nowhere near as much of a slog to get through.
My thanks to you for making it this far, and your comments and or questions are most welcome.
I very much enjoyed this, the narrative was great and the rules information useful. I was rootin for the Mori clan and especially the lone ashigaru spearman, what a hero.
ReplyDeleteWell done and following on from my previous comment, the buildings are top notch. Good call with them.
Many thanks John - the rules are currently available as a free PDF from Warlord Games for a limited time (along with Black Powder and several others).
DeleteI tried my best to stay neutral through the game, but I'm such a sucker for the "under dog" I ended up fretting for one side and then the other! I'm honestly loving the pace of this game :-)
If that spearman doesn't get promoted (or a pay rise at the very least) I'll be having words with Yoshihito ;-)
Thanks for the comments on the buildings, they look a little stark to my eyes at the moment but I'll start toning them down now. I'd not noticed until Joe pointed it out, but TT Combat tend to make their doors a little over-scale - this is far less apparent on the "Eastern Empire Scenics" range.
Again you've giving us a wonderful set with wonderful characters & more insight into the rules Greg, tbh I stayed neutral but would agree that the spearman certainly step up to the plate when those that are held in higher honor fell so I think a reward is the least he should get. :)
ReplyDeleteMuch appreciated Frank. If it seems I'm waxing lyrical about the rules, it's probably because I didn't believe the hype they were getting before I actually tried them ;-)
DeleteA delegation has been sent to Yoshihito (who's currently having his cut arm attended to) - he's mostly unaware of Tamaki Jiro's heroics, since he was unconscious at the time ;-)
Well done, Greg, for such an entertaining batrep. Like Frank, I remained neutral, but I do agree that the lone spearman was the man of the match. His performance was the stuff of legends.
ReplyDeleteMany thanks Bryan, and I'm determined to see that young ashigaru's performance rewarded :-)
DeleteI've just allowed myself a look at what prep work I need to do for the next scenario, and despite a busy weekend on the road, I SHOULD have another AAR for next week :-)
Very enjoyable AAR Greg, the rules seem very balanced with how this game played out. That spearmen should be put through Samurai training after his heroic effort, not that he would but certainly deserves it
ReplyDeleteGlad you enjoyed the AAR Dave, I certainly enjoyed the game :-)
Delete"Samurai" status was very much hereditary in the Japanese class system, but by the time of the Sengoku period the foot soldiers (ashigaru) were considered lower class samurai.
I'm still pushing for the chap's promotion though ;-)
Very enjoyable aar and the buildings did their job, though hiding inside one to acheive victory seemed a bit off, given that they weren't able to do so in the original scenario.
ReplyDeleteDo I take it that the Samurai 'leader; figures never die in these scenarios . merely severely wounded etc ?
Cheers Joe, I suppose the difference between "hiding" and "taking cover" is a point of view - I reckon either interpretation is better than standing silhouetted against a pale background just as the sun was setting with enemy archers around ;-)
DeleteI also reckon allowing movement into (or through where possible) buildings is more "realistic" than simply treating them as a solid obstacle - it's a change to the original scenario, but it offers the same advantages/disadvantages to both sides, so there was no argument from my opponent ;-)
In the Basic Rules (and they're in play for the introductory linked scenarios), you're quite right, and the samurai hero goes 'Out Of Fight' if he receives a major wound. Under the Optional Rules though, they can either be killed or wounded so severely that their fighting career is at an end :-)
brilliant AAR Greg, what a battle! that spearman...phew
ReplyDeleteThanks Andy, ToH aims at being more "cinematic" than "historical" and as a result the games are fast and fun :-)
DeleteExcellent report again mate!
ReplyDeleteMany thanks Simon - as ever, the post took FAR longer than the game so I'm glad you enjoyed it :-)
DeleteI will try and 'condense' the write ups though ;-)
Not a good day to be a samurai; the commoners seem to have garnered all the glory.
ReplyDeleteAgreed - "leading from the front" does have a few drawbacks ;-)
Delete